How to Create Flows with Power Automate to Automate Workflows Between Apps
- Blog
- Power Apps
- Post

Power Automate is a workflow service that allows you to automate many different actions across common apps and services. You can use it to automate just about anything you do by using what we call “flows”, which are a series of instructions you tell Power Automate to do for you. In this article, we’ll show you how to create flows with Power Automate to automate workflows between apps.
The brilliant thing about Power Automate is that with 500+ connectors, it is a gateway to all of your IT systems! There are hundreds of ways to connect data in Power Automate using connectors. When you build a flow, you string together a few of these 500+ connectors to perform actions on your data.
How to create flows with Power Automate
The thing that kicks off a flow with Power Automate is called a trigger.
Triggers
Power Automate supports several different triggers. Some triggers are automated, meaning that something happening to your data will automatically start the flow.
Other triggers are scheduled, or they happen whenever you put them on a calendar to happen. That could be once a year, once a second, or tied to a particular date and time.
Another type of trigger is an instant (or button) flow, which is manually kicked off by a user.
Simple example flow
A practical example of a simple-to-build flow is one that triggers when an item is created in a SharePoint list and sends an email to a designated user. The trigger is “When an item is created” from the SharePoint connector, and you choose “Send an email (V2)” using the Outlook connector.
With this basic example, you have your first flow! Please note that you must name your flow to save it: If you haven’t done this yet, go up to the top left of the screen and double-click in the text entry field to the right of the blue arrow pointing left.
Our example flow here is named “SimpleSharePointFlow”.
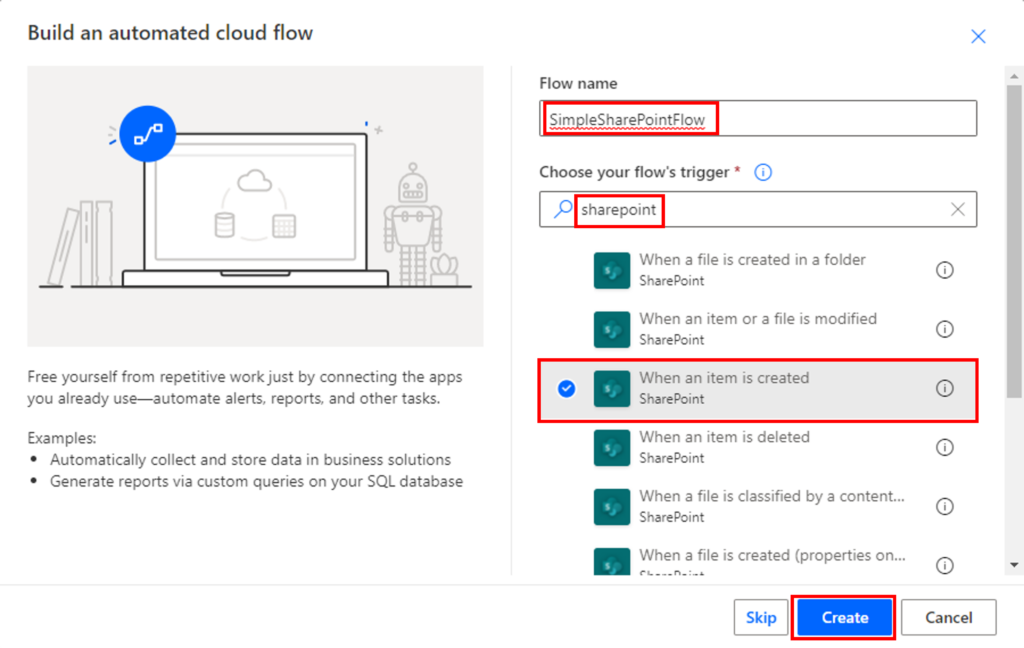
Here, our new flow will send an email to a user we designated when a new item is created.
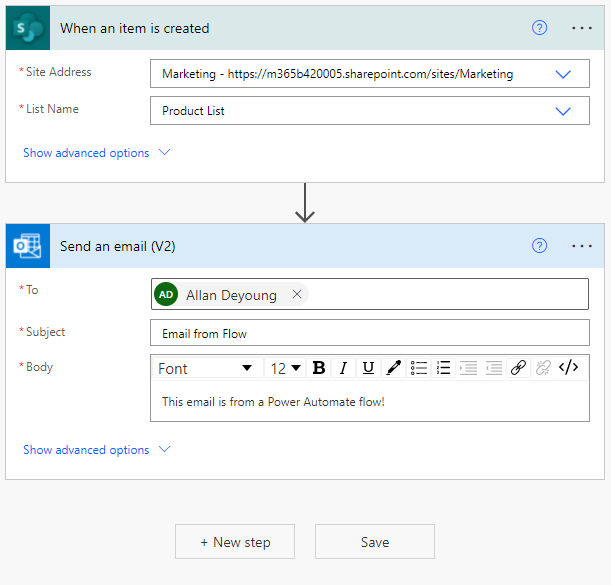
Our first flow has now been created in Power Automate.
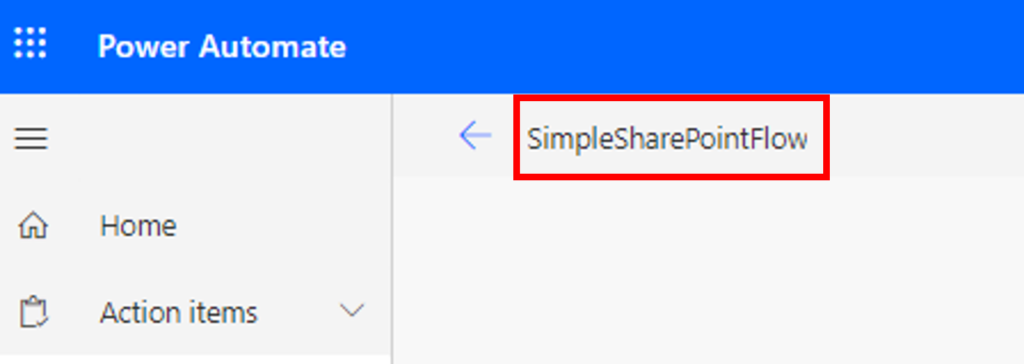
How to test your Power Automate flow
To test your flow, click the Test in the top right of the window. Since the trigger is tied to adding an item to a SharePoint list, you’ll need to click Manually and the flow will give you the message “To see it work now, add a new list item to the SharePoint folder you selected”.

Once you add an item to your SharePoint list, you’ll be able to switch back to Power Automate and see it execute. Both steps will get a green check mark at the top right corner if the flow has run correctly, and there will be a notification at the top saying “Your flow ran successfully.”

How to tweak your Power Automate flow with the Office 365 Users connector
Now, we’ll tweak our flow to send an email to the manager of the person who created the SharePoint item.
Send an email to the creator’s manager
Using the Office 365 Users connector can provide some organizational information relevant to the current user, as long as it has been defined in Azure Active Directory for that user.
The action we’re getting ready to add will query that property for the user, so if there’s no definition, we won’t have any data. If you add that connector into Power Automate, by pressing the “+” on the arrow between the two steps we built previously and selecting Add an action, and then entering “Office 365 Users” into the search window, you’ll see the actions available with that connector.

Select Get user profile (V2) to get information on the current user.

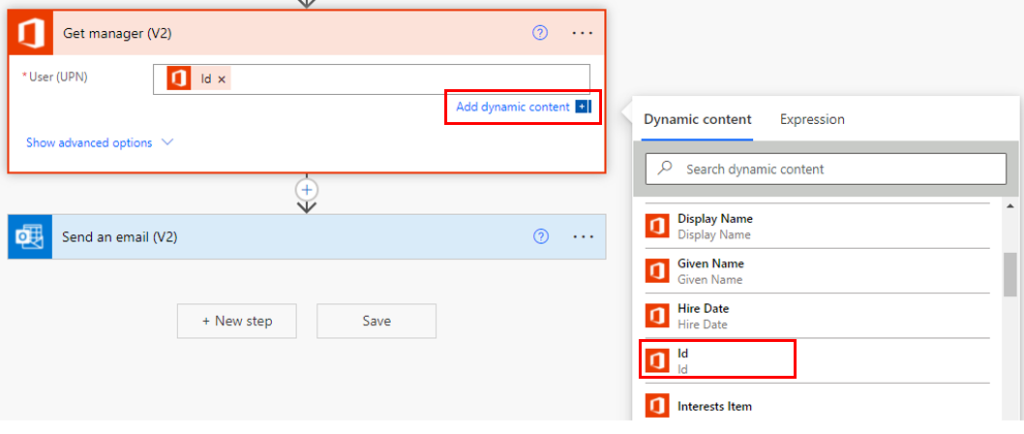
Next, we add a step to Get manager (V2). This step enables us to get the manager’s email so we can send the email to the item creator’s manager.
In our example, we’ve added the Mail field as dynamic content from Get Manager (V2) and included the user in the email “CC” line from Get user profile (V2), so we can see that it went to the user’s manager.
Add a condition to send an email to the company president
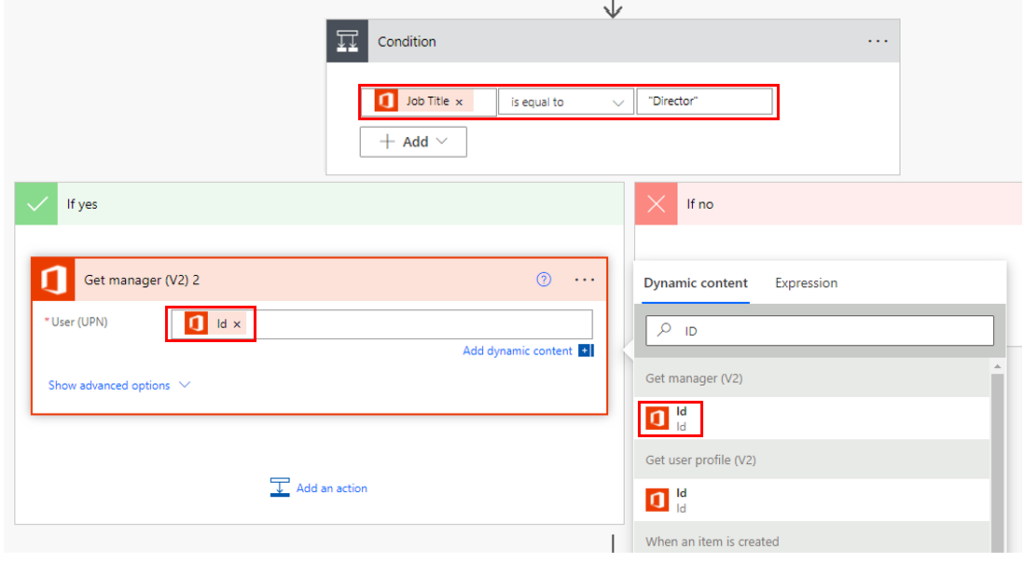
Another item that the Office 365 Users connector gives us is the job title information, which we can also use as a condition in our flow. In this example, we’re adding a condition to check if the job title of the manager is “Director”, and if so, we’ll send the email to the company president.
To do this, add a Condition step and select Job Title from dynamic content under Get Manager (V2), select “is equal to”, and type in Director. Once you enter this as your condition, you’ll see two branches appear beneath the step.
Within the If yes branch, add an action for a second Get manager (V2) step and click Add dynamic content to search for the “Id” field. Ensure that you click the “Id” under the “Get manager (V2)” step to get the director’s manager, who is the company’s President.
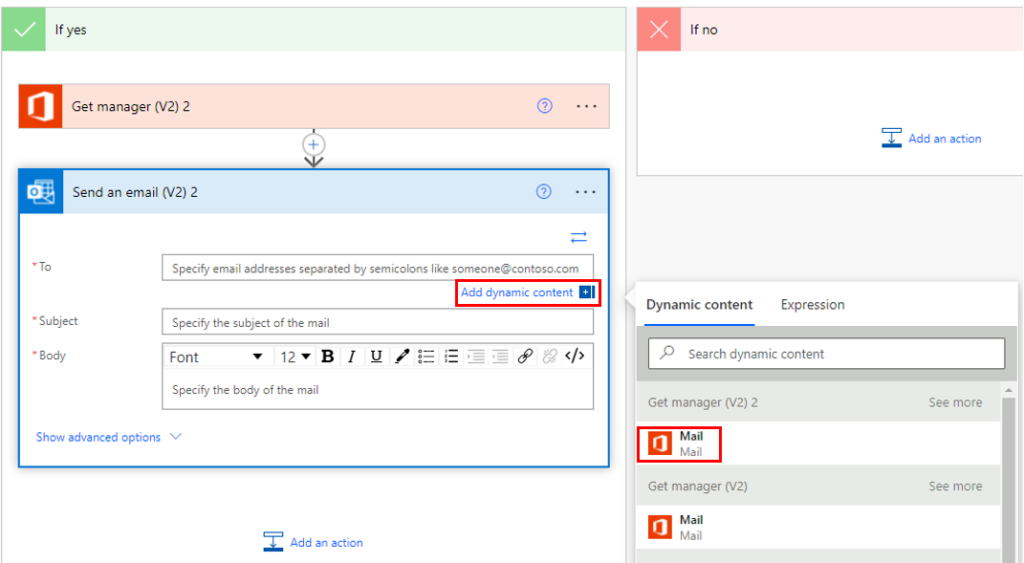
Next, we add an action under the Get Manager (V2) 2 step we just created to send an email. As we did previously, select Send an email (V2). Click inside the “To” line, add dynamic content, and select the Mail item under the Get manager (V2) 2 action.
At this point, it might be a good idea to rename your second “Get Manager” action to “Get President”.
To rename an action, click the three dots (. . .) at the right upper corner of the action and click Rename, and name it to something helpful.

In our example, we’ve renamed it “Get President Info”. Let’s rename the second email to “Send email to President”.
Now enter some text for the Subject and Body (be respectful since it’s going to the company president!). For our test, we’ll put the creator’s email in the “CC” line (in the Show advanced options section) so we can make sure the flow works.

Finish out your “If no” action
For the “If no” side of the condition we created, click on Add an action and insert a “Send an email (V2)” from the Outlook 365 connector. Click Add dynamic content inside the “To” line of the email and insert Mail from under the “Get manager (V2)” line.

Add an appropriate Subject and Body and save your flow. Again, you can add an email in the “CC” line so you can ensure that this side of the flow is working.
Another (easier) way to do this is just to copy your “Send an email (V2)” from beneath the Yes and No condition steps (by clicking the three dots and selecting “Copy to my clipboard (Preview)”. Then, you can paste it into Add an action by selecting My clipboard and selecting the action.

Finish and test your flow
Let’s tidy up the flow and delete any steps below the Yes/No actions. Save your flow and test it again to see if our email is going to the company president. This time, since you’ve already run it, select Automatically” > “With a recently used trigger and select the one that ran previously.
When you select a previous trigger, this simply keeps you from having to re-enter data to trigger it again. If your flow ran successfully, then congratulations!
How to build a flow using a template
Now that we’ve developed a flow from scratch, I’d like to introduce you to how to build a flow from one of the many templates available in Power Automate. From the Templates menu, type “Post MSN Weather updates to Yammer group everyday” and click the template result.
You may have to adjust your connections when the flow header comes up on your screen under “This flow will connect to:” before you can press Continue. Notice that Power Automate builds a flow for you completely.

Now, we’re going to tweak this flow to post this message to Microsoft Teams instead of Yammer. We can do this by adding another step and searching for the Teams connector, and further looking for the step “Post message in a chat or channel”.
You need to select the Post as, Post in, Team name, and Channel name, and then you can simply copy from the Yammer field above to grab the message text to paste it in the Message field of the Teams step we just added.

Next, click the three dots in the Yammer step and select Delete, rename your flow (you can replace Yammer with Teams), go to the Get forecast for today step and add in the Location and Units (either Imperial or Metric), save it, and test it out.
Notice how our flow posted a card in our Teams channel with the forecast for today in Redmond, WA.

One more Teams template
Now, we’ll do one more Teams flow where we schedule a reply to a Teams message that we’ll send at a later time. Go back to the Power Automate Templates menu and type “Schedule a reply”, hit Enter, and select the resulting template.

Click on the Create Flow button. After a few seconds, you’ll be at the title page for the flow “Delayed reply to a message”. Click on the Edit icon at the top left of the window and you’ll see a seven-step flow.

If you expand out all of the Conditions, this flow is pretty complicated with multiple branches, and all you had to do was to click a button to create it!
Notice that you cannot test this flow inside Power Automate, but if you go back to Teams, you’ll see that Power Automate sent you a card that says “Your flow is ready to be run”, and that you can run it from the overflow menu of any message.
So, go into a Teams room and post a message, click on the message and click on the three dots in the upper right, hover over “More actions” and you should see the flow that you just created!
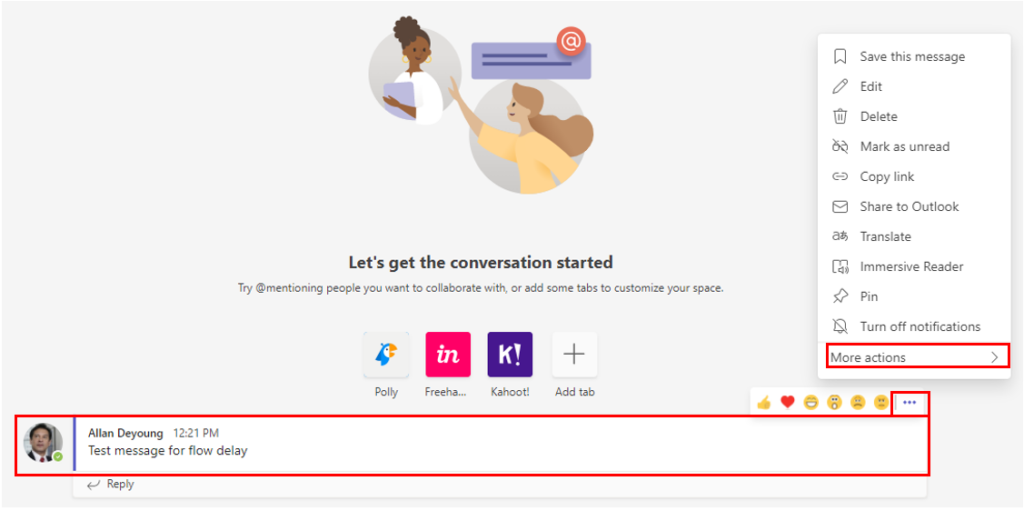
Click on that flow and an adaptive card will pop up on your screen where you can enter the information to trigger your flow including date, time, and message. Click on Submit and then you can go back to Power Automate and see that your flow has run.

At the time you entered in the adaptive card, your flow will post the message into your Teams message board. You can use this feature to provide reminders to yourself or others in your team.
Summary
Power Automate is set up to help users quickly build low/no-code solutions without having a great deal of knowledge or experience. We’ve walked through how you can build simple flows triggered by changes to your data, how to test your flow, and how you can use/modify pre-built templates that Microsoft has already written for us.
All of this can be done in a matter of minutes by any authorized user in your Office 365 environment. It is a powerful tool with some dynamic possibilities.
